Remote Video Astronomy
Practical solutions to questions when using video assisted Astronomy remotely
  • Home
  • RVA
  • Start Simple
  • Learn More
  • Expand
  • Downloads
  • Blog

Using Focal Reducers and MMEC software with the Pro Dob II on a portable RVA setup

1/20/2015

0 Comments

 
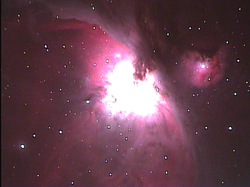
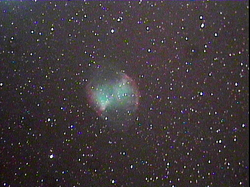
While testing the MallinCam Pro Dob II (PD2) camera with my latest release of the MMEC software, I looked into how much focal reduction could be reasonably used with my Celestron 130 Newtonian scope. Focal reducers increase your field of view and can shorten the exposure times. A focal reducer works by concentrating the light cone produced by your scope into a smaller, brighter circle.  My Newtonian is an F5 scope which is already “faster” than my other SCT scopes (they are F10).  The following images were captured on different nights, so the image quality varies, but you can see the effects of using different focal reducers. Here is the Orion Nebula (M42) using the Pro Dob II on my 130 Newtonian F5 scope with no focal reducer (No FR = 1).
Picture
Here is M42 using a MFR-3 focal reducer with a 5mm spacer (MFR-3 reduction = 0.67).
Picture
Here is M42 using a 0.5x Antares focal reducer on the end of a nosepiece (0.5x FR reduction = 0.49).  You begin to see some slight elongation of stars (coma) at the edges of the field of view. Note that even though this is called a 0.5x focal reducer, its reduction as used here is 0.49.  The actual reduction can vary depending on the distance between the sensor chip and the reducer.
Picture
Here is M42 using the MFR-5 (MFR-5 reduction = 0.43), which shows the MFR-5 is a bit too aggressive to use with the PD2 on this telescope.
Picture
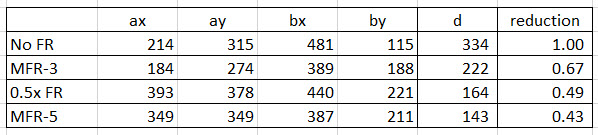
To compute the effective reduction, I measured the x and y pixel position of the same two stars a and b on each of the images. 
Picture

Then I computed the pixel distance d between them for each configuration and its effective reduction to produce the following table, where d = sqrt(dx*dx + dy*dy), dx = ax-bx and dy=ay-by.  Reduction is computed by dividing d for each focal reducer by the d of No FR.
Picture
With this scope I use either MFR-3 or 0.5x FR, but in general I prefer to use the MFR-3 with the 5mm spacer for good reduction with least side effects.  This essentially converts the F5 Newtonian to a faster F3.3 setup (F5 * 0.67 =F3.3).


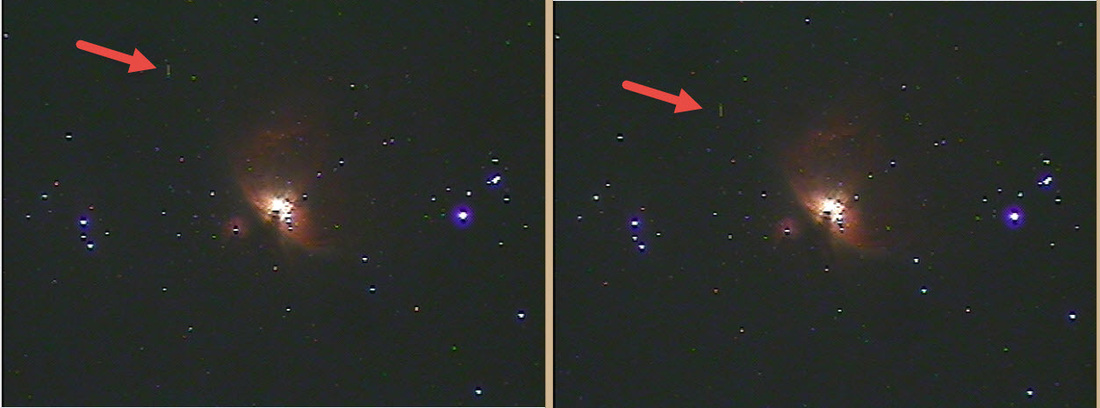
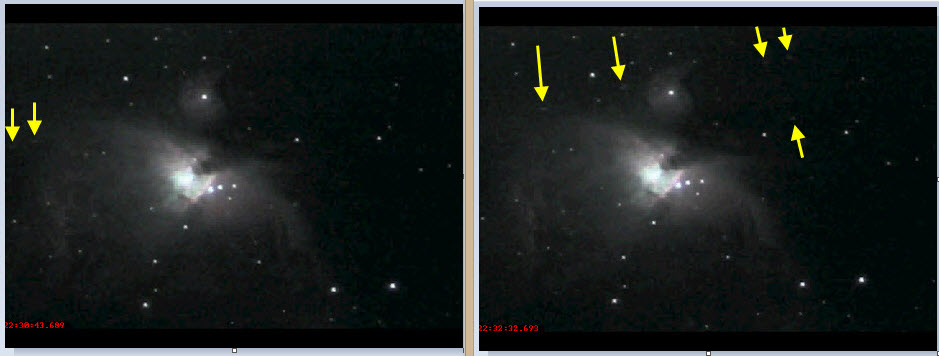
The above images of M42 were all captured with the camera sharpness set to 20.  Setting sharpness to a lower value will make the stars appear more round like you see in photographs.  Here is M42 again using the PD2 and MFR-3 with sharpness set to 3.

Picture
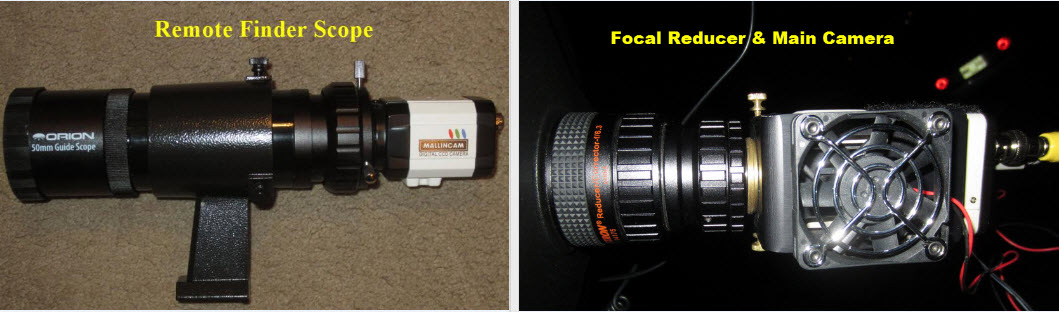
The design of the Pro Dob II camera enables plenty of inward focus.  It also accommodates standard 1.25” focal reducers rather than having to use 2” focal reducers. Below is the Pro Dob II camera with the 1.25” MFR-3 focal reducer attached.
Picture
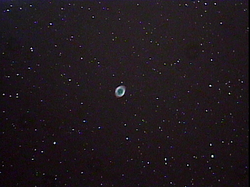
And here is the Pro Dob II on my SkyProdigy 130 using the 2” eyepiece adapter.
Picture
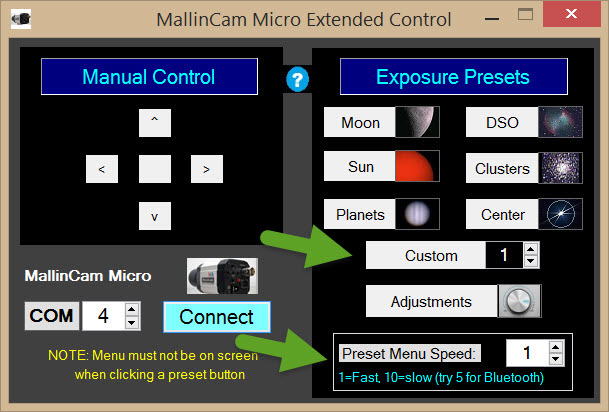
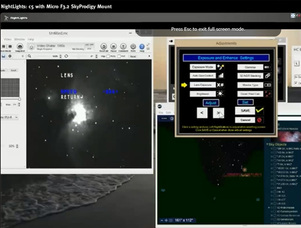
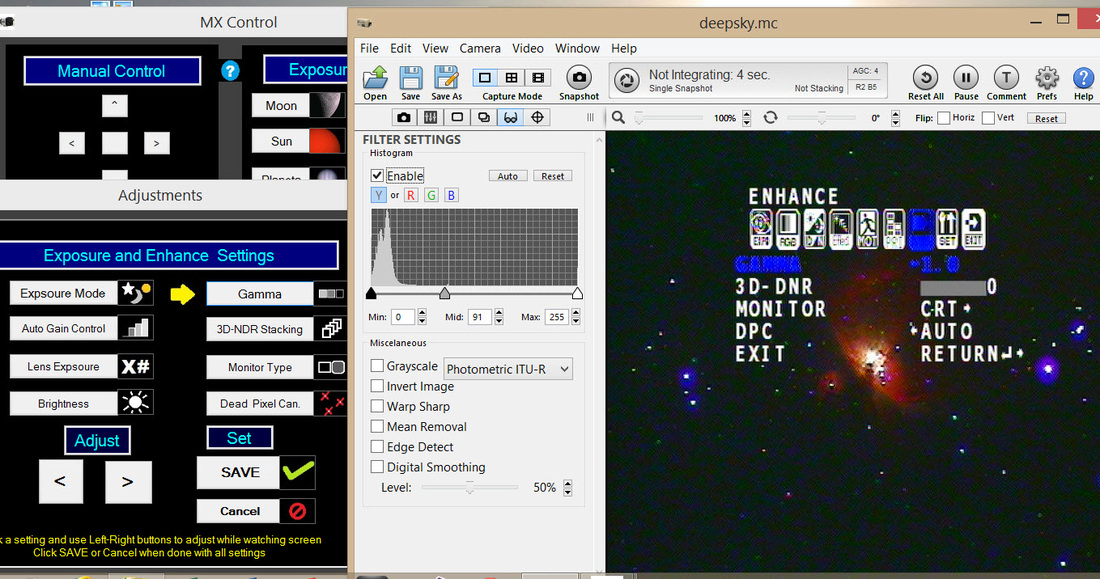
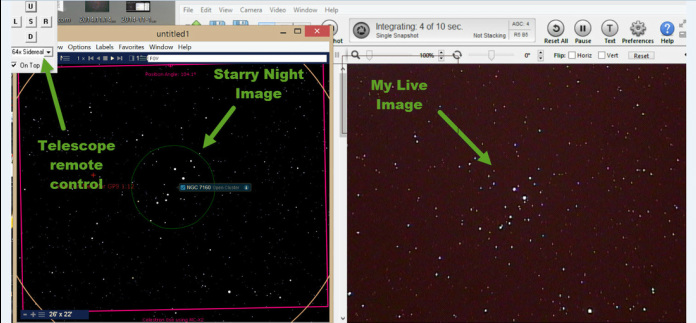
Through these tests, I was able to confirm that the Pro Dob II is 100% compatible with the new version of my MallinCam Micro Extended Control Software. I made use of the new custom presets of the MMEC software during these tests.  The Custom 1 preset I provide with the MMEC software enabled me to easily switch the camera to focusing mode after I changed focal reducers to assist focusing on a bright star with the modified setup. Then I slewed to M42, centered it, and clicked on another custom preset for M42. Since it is easy to create standard custom presets, I was able to quickly create one just for the Orion Nebula that matched my setup for the evening.  Here is the setCustom9.txt preset file (standard format) that I created by copying setCustom1.txt and changing it using Notepad to the settings I wanted to use for the Orion Nebula.
Picture
Exposure: Normal - Setting for Orion Nebula
SenseUp: Off
AGC: Off
Lens: x512
Brightness: OK
Gamma: 0.6
3D-DNR: 0
Monitor: OK
DPC: Off

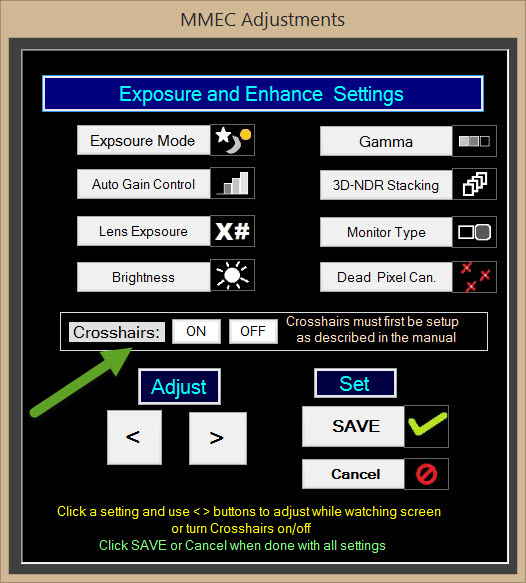
The latest version of MMEC also supports a new manual custom preset format that allows you to change settings other than just the Exposure and Enhance settings.  Manual custom presets take a little more thought and testing though.  You create a text file containing the button presses needed to navigate to the setting you wish to change and then set it to the desired value.  You need to first adjust the setting to its lower or upper limit so it is at a known value, and then you can change it to the desired value.  Here is a setCustom7.txt preset (manual format) that changes the sharpness to 3 for more photo-like stars.
Picture
Manual - Set sharpness to 3
- Display Menu
Enter
- Move to Effect
Right 3
- Set sharpness to 3
Down 2
Left 50
Right 3
- Return to Menu
Down
Enter
- Exit and Save
Right 5
Down 2
Enter


And here is a setCustom8.txt preset that changes the sharpness to 20 whenever I want increased sharpness.
Picture
Manual - Set sharpness to 20
- Display Menu
Enter
- Move to Effect
Right 3
- Set sharpness to 20
Down 2
Left 50
Right 20
- Return to Menu
Down
Enter
- Exit and Save
Right 5
Down 2
Enter

Now for a little human interest story…

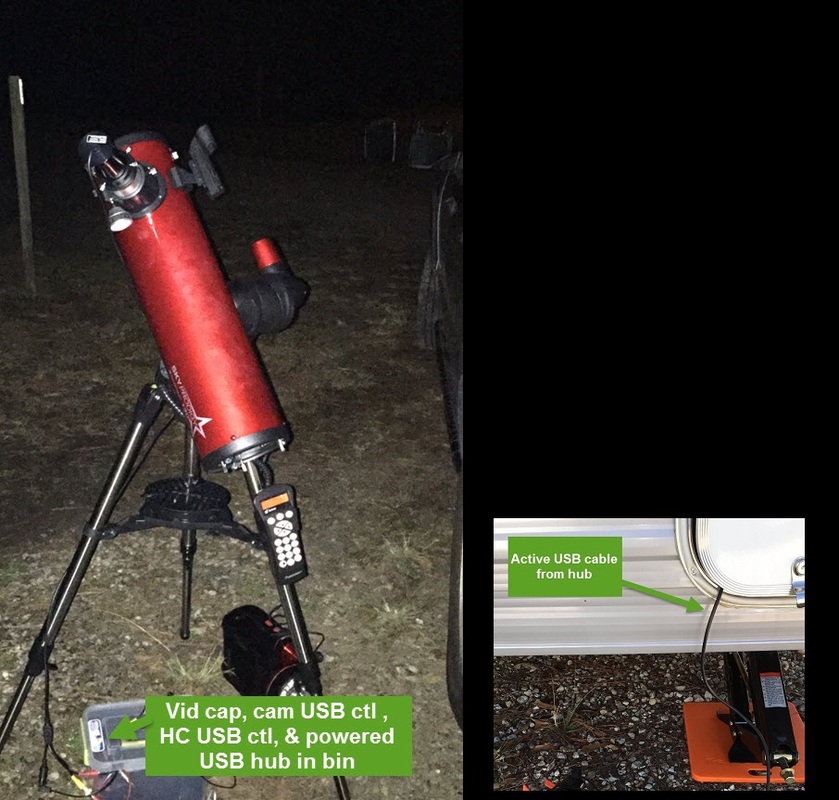
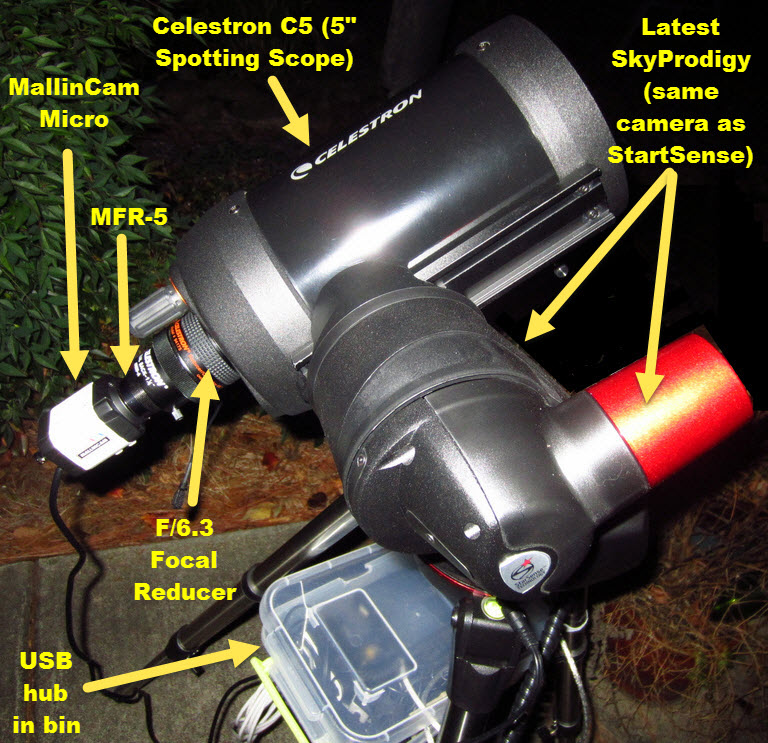
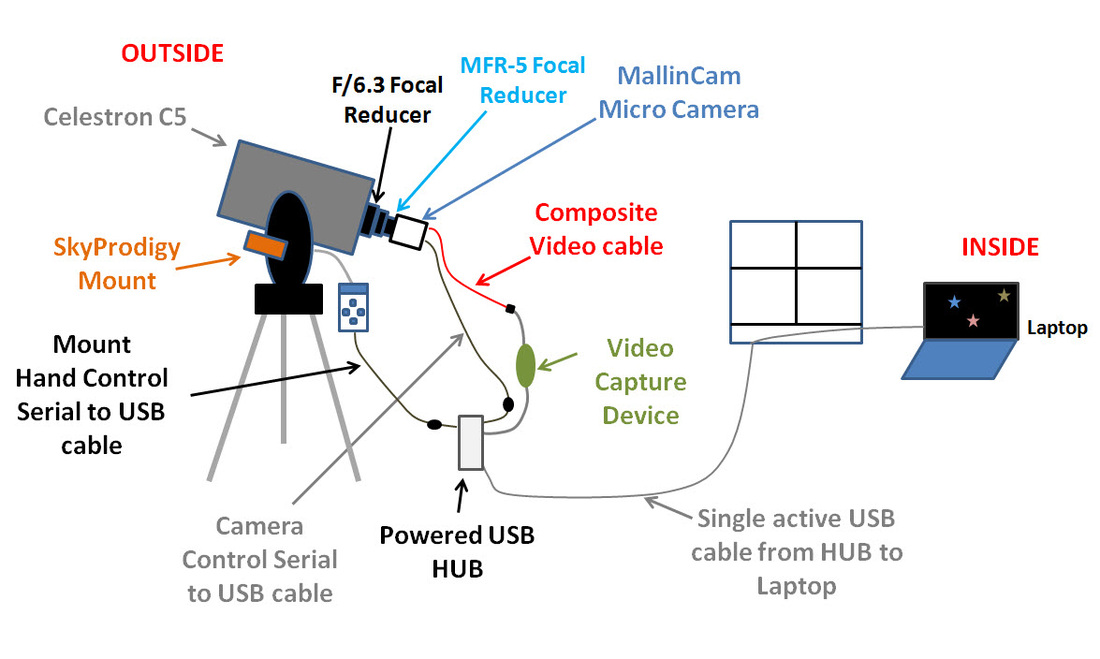
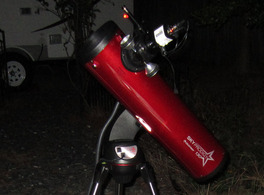
I did a portion of these tests while recently camping using a portable RVA setup.  The temperatures each night were below freezing as you can see by the frost beginning to form on the scope.  I used a battery power tank to power the mount.  I also used a plastic bin to contain a video capture device, camera computer control USB cable, hand controller serial/USB cable, and a battery powered hub at the scope with a single active USB cable run into my camper.

Picture


Although it was cold outside, I was a warm happy Astro camper inside.  :-)


0 Comments

MallinCam Micro Extended Control software update - Version 1.0.1.7

1/10/2015

1 Comment

 
There is a new version of the MallinCam Micro Extended Control software available on the Downloads tab (be sure to also download the new MicroExtended.pdf manual as well). If you are updating from a prior version, be sure to first uninstall the prior version by going to the Windows Control Panel and use add/remove programs to select and uninstall the "Micro Extended Control" program, and then install the new version.

Version 1.0.1.7 includes the following enhancements:


Picture
1. Custom Presets: You can develop several of your own Custom Presets using either the Standard Preset format or a new Manual Custom Preset format.  Manual custom presets can be used to adjust settings on menu selections other than the Exposure and Enhance settings.
Picture

2. Preset Menu Speed: You can adjust how fast the Menu is navigated when using a preset.  This is especially useful when using Bluetooth, allowing you to adjust for the communication overhead of Bluetooth. 

Picture


3. Crosshairs: You can turn crosshairs on/off in the Adjustments window if you have set up crosshairs as described in the manual.

Picture
Picture

I hope this MMEC software will enable you to easily tailor your camera settings to your equipment setup, and spend less time pressing buttons and more time "viewing" remotely.
1 Comment

MallinCam Micro Extended Control (MMEC) demo on Night Skies Network

12/17/2014

0 Comments

 
Picture
If you are thinking about getting into Video Astronomy, you should check out Night Skies Network at
NightSkiesNetwork.ca
to watch Video Astronomy in action. 

You can sign in as a guest and just observe, or you can join in the discussion (via text) about the viewing session.   

Since this is an Internet based broadcast, you can see the broadcast from anywhere in the world – that’s really seeing things remotely! 

You will learn a lot just by watching others adjust their camera settings, hear them talking about what they are doing and what is being viewed, and watching the discussion text during the live broadcast.  If you do delve into Video Astronomy yourself, you can sign up for free and broadcast your viewing sessions for others to see as well.

So when you have some free time one night, go over to Night Skies Network and enjoy seeing the heavens through other people’s equipment in near real time! 

Picture
My broadcast name on Night Skies Network is NightLights.  Last night I broadcast a live session demo using my Mallincam Micro Extended Control software to show others how it works and what it can do (you can download the software for free on my Downloads tab).   I used my portable Remote Video Astronomy setup - Micro and my C5 scope on my SkyProdigy mount with two focal reducers to convert my scope from F10 to about F3.2 for a wider field of view and shorter exposure times. 

  You can view a copy of the broadcast on YouTube at:             http://youtu.be/UdRGWensG94

0 Comments

Seeing something you are not expecting

12/13/2014

0 Comments

 
For my advanced setup, I use my MallinCam Micro on a 50mm guide scope as a remote video finder.  I use Focal Reducer(s) and my MallinCam X2 for my main camera on my 8” Celestron.
Picture
By using the Micro as a finder camera with AGC=high and Lens at x32, it makes it easier to center your target due to the fast screen update rate.  I am not as concerned about the quality of the finder image when used this way – it just needs to update quickly.  When the target is centered in the finder image, I then switch to my main X2 camera for viewing the target through my 8” scope.
Picture
The other night I thought I would play with the Micro some while it was on the 50mm scope since it provides a really nice wide field of view. My MallinCam Extended Control application (see my Download tab) can be used to adjust the Micro’s camera settings in parallel with other programs that can enhance the camera’s image in real time.   I like using the MiloSlick MallinCam software live image filters like the Histogram Level Adjustment that can really improve the appearance of DSOs.  The MiloSlick application does not have controls for the Micro settings, so I just run my application next to the MiloSlick app and use my program to initially set the camera settings for the best picture, and then use the MiloSlick real time processing functions to improve it even more.  Here is where I am using my program on the left of the screen to adjust the camera's Gamma for the best image, and further improving the image using the MiloSlick histogram feature.
Picture
While I was doing this, I observed what I believe to be a geostationary satellite "move" through my field of view right next to the Orion Nebula.  It showed up as a short streak that moved down the screen.  The length of the streak was based on the camera's exposure time.
Picture
Even though it appears the satellite is moving through the image, a geostationary satellite is in a fixed position above the earth.  So if it is not moving, why does it appear as a streak?  This is because my telescope mount is tracking an area in the sky to keep the Orion Nebula fixed in the field of view while the earth is rotating.  So as the Orion Nebula rises in the sky, my mount is moving upward as it tracks it.  As it tracks past the area of the sky where the geostationary satellite is positioned in its fixed location, it makes it appear that the satellite is moving in the camera’s field of view.

I saw this once before a couple years back as I was just getting into Video Astronomy using my Samsung 2000 camera modified for Video Astronomy.  I actually saw five satellites “moving in formation” past the Orion Nebula.  I first noticed two coming into view on the left, and then saw five as they moved across the display. They are pretty faint in a single image, but your eye picks up the movement as you see them change their position against the background image of the stars over a short period of time.

Picture
Of course they weren’t flying in formation past the Orion Nebula, but it sure looks like it!  Fortunately I had acted quickly and captured a video clip of it.  So yesterday I rummaged around and found my old video clip, edited it and posted it on YouTube.  You can view it by clicking on the link below.

http://youtu.be/dThrTt9uNTc

Sometimes you see something you are not expecting!

0 Comments

Lightweight Portable Remote Video Astronomy setup

12/4/2014

0 Comments

 
I have found I can use other light weight scopes on my SkyProdigy mount.  I can easily use my C5 on my SkyProdigy mount for a nice portable Remote Video Astronomy setup.  Since the C5 is a short scope, it can point straight up without worrying about slew limits (I would guess this would be true of the SkyProdigy 6 as well). When changing scopes, I find it is best to recalibrate the SkyProdigy’s camera to improve centering when slewing to an object.  This is an intermediate setup beyond what I describe in the Start Simple tab.  By using the MallinCam MFR-5 reducer on the Micro and a Celestron F/6.3 reducer on the Scope, the F10 C5 effectively is converted to a faster F3.2 setup for Video Astronomy. Stacking these two focal reducers is pushing the limits a little though (I sometimes remove the F/6.3). Here is a photo of the equipment setup.

Picture
This makes a lightweight “Grab & GoTo Scope” setup for RVA using the SkyProdigy mount. The Micro video output cable is connected to a small video capture device located inside the plastic bin.  The video capture device USB cable along with the Micro camera control USB cable and hand controller USB cable are plugged into a powered USB hub also in the plastic bin attached to the mount’s tray.

Picture
I keep my scope setup like this inside.  To use it, I pick it up and take it outside, power on and start the auto align.  While it is aligning, I unroll the hub’s 35 foot active USB cable, pass it through a window (and close the window down to the cable) and connect the USB cable to my laptop inside.  By the time the SkyProdigy finishes the alignment (about 3 min) I am ready to begin viewing inside. 

Picture
Using my Micro Extended Control software, I click on the Focus preset first thing, slew to a bright star and make sure it is still in focus. If not, I go back outside with a battery powered LCD to connect to the camera, put the focus mask on and adjust the focus… and try to remember to remove the focus mask when done 😊.  I reconnect the camera video output to the video capture device and return inside.  From first picking up this setup to beginning to slew to my first target is about 10-20 min depending on the focus check.

Anytime I slew to a new target (from inside), I click the Focus preset and center my target object using the telescope controls in Starry Night on my laptop.  Since the Focus preset enables the image to be updated every ½ second, it is a good setting to use when centering target objects like clusters or DSOs.  Once centered, I click on the appropriate Preset for the target object for better viewing.  Sometimes I also click on Adjustments to fine tune the Exposure and Enhance settings. 

0 Comments

Does the Micro display color when 3D-DNR stacking is used?

12/1/2014

0 Comments

 
This is a question that some have wondered about.  You may be wondering what does this question mean and why should I wonder about it?  This would be of interest to you if you have or were thinking of purchasing the MallinCam Micro for Video Astronomy use.  Sky conditions were not the best, but served my purpose for this test.  Here is the Dumbbell in color using a 17 sec exposure (without using 3D-DNR) on a 5” Celestron with F/6.3 focal reducer and the Micro with a MFR5 focal reducer. 
Picture
So what’s the deal with using 3D-DNR?  This additional setting allows you to average up to five 17 second images in real time, in color. But to use 3D-DNR the AGC must be turned on, which can wash out an image and make it appear to be just a monochrome image.  Unless … you also adjust the color settings.  I was able to successfully produce an image of the dumbbell with color using 3D-DNR.  Below is the Dumbbell with 3D-DNR stacking set to 5, AGC set to high, Brightness set to 2 and Color/WB/ATW R-Y Gain = 250 & B-Y Gain = 250.  Here is the result.

Picture
And this was from my backyard near a city with a partial moon! Due to the sky conditions, these pictures are certainly not breath-taking, but they do illustrate the Micro can show color when stacking. Just to emphasize the sky conditions, here is the image of the Moon I also captured right after viewing the Dumbbell.

Picture

Not great conditions for viewing DSOs, but it is a nice view of the Moon!


Equipment, software and setup

These images were produced with a Celestron C5 (5" spotting scope) with a F/6.3 Focal Reducer and the Micro with a MFR-5 focal reducer on the latest SkyProdigy mount. This is my quick Remote Video Astronomy setup. I can pick it up and take it outside, start an AutoAlign, extend the cable inside to my laptop and be viewing from inside in 10-20 minutes. All these images were viewed and captured while inside.


I have actually written my own software for the Micro with Exposure and Enhancement presets so I can just click on a DSO icon or a Moon icon and it automatically sends the commands to the Micro to change the settings.  The software is available for free on my Download tab.


All but the color R-Y gain and B-Y gain can be automatically set using my Micro Extended Control Preset.  To include 3D-DNR stacking in the DSO preset, modify the setDSO.txt file  as shown below (the setDSO.txt file is in C:\MicroSettings):

Exposure: Normal
Senseup: Off
AGC: High
Lens: x1024
Brightness: 2
Gamma: 0.45
3D-DNR: 5
Monitor: LCD
DPC: Off


The other setting you need to adjust is the Color White Balance which must be set using the control buttons in the Manual section of my application.  Click the center button to bring up the Micro's menu on the screen and then the right button to go to the Micro’s Color menu option.  Click the Manual buttons to select WB/ATW and set the R-Y gain and B-Y gain settings to 250. Once set, they will remain at that value until manually changed again (you may want to try 200, etc.)

Now clicking on the DSO preset will automatically use the values from your revised DSO Preset file to set the Exposure and Enhance values for stacking in color.


01/10/2015 Update

Although the Micro can produce color images using AGC and stacking, I have found I prefer using the Micro the way I have been using it.  I start with AGC on high with no stacking to center my target image.  Then I turn AGC off and change the setting to x1024 (or less depending on the brightness of the target) to produce a nice detailed color image.  It appears that longer exposures without AGC produce more detailed images (so I do not use a modified setDSO.txt file as described above).

The new release of the MMEC application now has a preset for Center that enables you to quickly change the settings to center your target.  Then you can click on the DSO preset to change it to the best setting for more detail .  I usually want to invest the additional 20-30 seconds to try the longer exposure with no ACG to see what additional detail it might reveal.

0 Comments

If a picture is worth a thousand words ...

11/25/2014

0 Comments

 
Picture
Then what is a live image worth? A lot more! It's not just the image though. It is seeing the live image, the experience of slewing your telescope to a point in the sky you just chose, seeing star trails on the screen until the telescope starts tracking that precise area of the sky, and seeing your target object appear on the screen. Then you fine tune your settings, maybe increase the exposure time a few more seconds, and you see your selected object better than you ever saw it through your eyepiece.

I admit you sometimes can't help but click the capture image button for a permanent memory of what you are seeing live.  Maybe you want something to show so you can tell somebody about it later. But a recorded picture is not the essence of video astronomy. It is the experience itself that is important. And others can experience it right there with you in real time. If you do capture some images, they will probably not be "as good" as astrophotography pictures, but they are still pretty amazing. All camera "pictures" on this site are real time captures of the image being viewed at the time.

Astrophotography is certainly its own worthy pursuit that produces a high resolution picture with even better detail and color. But it's a different process and experience. You will typically spend more time capturing images of just a few targets in one evening. Then you invest more of your time after you put up your telescope to work with your captured images using post processing techniques, and produce the best picture you can get.  For DSO astrophotography, you will typically need very good tracking and maybe even use autoguiding. The efforts you put into astrophotography can be very rewarding, but it’s different from Video Astronomy.  With Video Astronomy you capture the moment.

Extending Video Astronomy inside through RVA techniques provides yet another unique type of experience. Being an engineer and programmer I have always been intrigued with robotics and computer remote control.  Having planetarium software enabling you to slew to your target and then compare the expected image to what you see live on your screen is really great.


It's nice to be inside, pick out an object on your laptop's screen, and then click to initiate your telescope moving to that specific point in the sky from your current spot on Earth, watch the display showing the camera's image as stars stream by, and it slows and settles in on your target. Then after a few adjustments you tell someone nearby ... take a look at this!  And you both look at it together at the same time.

Picture


Later on you tell someone, I gotta show you an image of what we saw that night.


Picture


And this.


Picture


And this.


Picture

And the other day I was checking out some sunspots (while inside where I can see a lot better) and saw this...


And last night I saw...

And you talk about what you experienced that night.

0 Comments

A good beginner telescope and mount for RVA

11/17/2014

0 Comments

 
Picture
My use of the Celestron StarSense Accessory got me thinking about the SkyProdigy 130 for a light weight portable scope with auto align capability for RVA.  The alignment camera is integrated into the SkyProdigy mount instead of attached to the scope (like is done with the SSA), so it also makes it easy to use with different scopes. Initially, I saw posts indicating you cannot connect to the SkyProdigy hand controller serial port to control it from your phone or laptop, which would rule out RVA use, and that it did not use the same camera as the SSA. Then I found out all new SkyProdigy telescopes would start shipping using the same internal camera and hand controller as the SSA. If the SkyProdigy hand controller uses version 1.06 or higher, it is the newer model.

So I ordered one, but received a SkyProdigy from a vender’s stock that was not one of the new ones (The hand controller version and build date were old). They accepted a full return with no problems. I then ordered a SkyProdigy 130 from a vendor who was out of stock, which guaranteed I would get a new one from Celestron. I received it and verified the version and found it is the same hand controller and internal camera as the StarSense accessory. I even tried using my SSA hand controller on the SkyProdigy and it worked just fine.


So I set up the SkyProdigy outside and found it was just what I was looking for as a portable auto align scope for RVA! Its hand controller works fine wirelessly with SkyFi and SkySafari on my phone. It also works with Starry Night using serial to USB to my laptop inside. I did perform a camera calibration which slightly improved the pointing accuracy (even though it came pre-calibrated).  I found I could use my Mallincam Micro camera without a focal reducer and get good results since the 130mm is a F5 scope, providing a nice field of view and shorter exposure time (I have to use a focal reducer on my C8 to convert from F10 to F5 for better RVA use).

If you are thinking of buying a new telescope and mount to use for Remote Video Astronomy, I recommend beginning with the SkyProdigy 130 for the following reasons:

1. It is lightweight and easy to set up
2. The 130 is a fast (F5) 5.1” scope suitable for Video Astronomy
3. The F5 scope provides a good field of view with the Mallincam Micro without having to use a focal reducer
4. It has auto align functionality built in, which really simplifies and reduces RVA setup time
5. It can be computer controlled remotely
6. Its Newtonian open design adapts quickly to the outside temperature
7. The alignment camera is built into the mount (not on the scope)


The SkyProdigy is an entry level Alt-Az mount, so you do have to be patient for a few seconds after slewing to an object while its tracking overcomes any backlash, thus eliminating star trails.  Due to the length of the 130 scope, your maximum altitude slew limit is 70 degrees.  But that is a similar limitation with my SE Alt-Az mount.  I have a Celestron C5 that weighs about the same as the 130.  I found I can use my C5 on the SkyProdigy mount with no slew limitations.  It can point straight up even with a video camera in place!  So if you decide to spend more and get the SkyProdigy 6, it should likewise not have any slewing limits (You will want to use a focal reducer with it though).

A couple more suggestions.  The SkyProdigy always tries to slew to the same three points for its alignments if there are no obstructions, so learn which direction is best to point your SkyProdigy when starting an auto align. Using a rechargeable PowerTank (or similar) battery with a long power cord eliminates the need to purchase batteries, and the longer power cord really helps.

0 Comments

 The benefits of auto align functionality for RVA

11/16/2014

0 Comments

 
Picture
I have been very pleased using Celestron’s StarSense Accessory (SSA) on both my CG-5 and SE mounts. It really makes alignment quick and easy without having to sometimes put your body in weird positions trying to see that pesky star you want to add to your alignment.  It also completely eliminates the need to use an eyepiece to perform the alignment and then replace your eyepiece with your video camera, and refocus … while making sure you don’t disturb your good alignment.  Of course you can perform an alignment with your standard hand controller using a video camera, as long as your finder scope is positioned well itself so that when a star is centered in your finder scope, the star will also be in the field of view of your video camera ... and if your video camera is already fairly close to focus. If you use the StarSense Accessory, you do not even need a finder scope for an alignment.  In fact you do not even have to have your video camera in focus yet, or for that matter the video camera does not even have to be turned on. I turn on my mount and start the auto align process with my video camera already in place, but don’t bother with the focus until the alignment is complete.  Then I slew to a bright star, put a focus mask over the end of my scope, make sure my camera is in good focus, remove the mask and am ready to begin viewing.

With auto align, if I change out any of my optics before beginning my viewing session (focal reducers, barlow, video camera, etc), I can wait until the system is aligned and tracking before focusing the new setup.  This is especially helpful when using an Alt-Az mount since it does not begin tracking until the mount is aligned.

I have added a JMI remote focus control to my C8, which when used with the SSA allows me to get everything in place both outside and inside before I turn anything on.  I then power everything on at the telescope, start the auto align process, go inside and power on my laptop and start up my video monitoring and control software.  When the auto align is complete, I slew to a bright star and check my focus and am ready to begin.


0 Comments
Forward>>

    Author

    Astronomy was my favorite hobby many years ago, but was gradually set aside due to work, family and life in general.  In recent years I resumed my hobby looking forward to using the new technology that is now available.  Then I discovered Video Astronomy.  Then I learned how to do it Remotely.  I wrote some books, and decided to set up this web site to continue to pass on what I learn.

    ​Jim Meadows

    Questions or comments?  Email me at:
    ​[email protected]

    NOTE: If you use Microsoft Edge and clicking on an Archives or Categories link below does not work, please try an alternate browser (e.g. Chrome).

    Archives

    February 2025
    August 2024
    April 2024
    February 2024
    October 2023
    June 2023
    September 2022
    May 2022
    May 2021
    December 2020
    October 2020
    May 2020
    March 2020
    February 2020
    July 2019
    June 2019
    May 2019
    January 2019
    December 2018
    November 2018
    October 2018
    April 2018
    March 2018
    November 2017
    October 2017
    September 2017
    August 2017
    June 2017
    April 2017
    March 2017
    January 2017
    December 2016
    October 2016
    August 2016
    July 2016
    May 2016
    April 2016
    March 2016
    February 2016
    January 2016
    December 2015
    September 2015
    August 2015
    June 2015
    April 2015
    March 2015
    January 2015
    December 2014
    November 2014

    Categories

    All
    Accessories
    AGc / AGm
    Articles By Others
    Astrophotography
    Auto Align
    Build
    Commentary
    DS10c
    DS2.3+
    DS26cTEC
    DS8300cTEC
    Eclipse
    Focal Reduction
    Hyperstar
    LHDR
    LPP
    Mallincam Micro
    MallinCam Netbook Kit
    MallinCamSky
    MallinCam X2 / XT
    MallinCam Xterminator
    Miloslick
    Mmec Software
    Permanent
    Pier
    Portable
    Pro Dob 2
    RASA
    RVA
    SkyBT
    SkyFi
    SkySafari
    SkyShed
    Software
    Solar Viewing
    Star Parties
    Starter Telescope
    Video Astronomy

    RSS Feed

Web Hosting by Domain.com