A few years back I began my re-entry into Astronomy by purchasing a Celestron 8se telescope and mount. That same year I discovered Video Astronomy and was hooked! Although the 8” telescope worked well for Video Astronomy, the 8se mount tracking limited it’s use for Remote Video Astronomy (RVA). I then upgraded to a Celestron CG-5 German Equatorial Mount and continued to use the 8” telescope, which was a great combination for Video Astronomy. Later I wanted a more portable mount, so I purchased a Celestron SkyProdigy 130 with built in auto align capability. Both the CG-5 and the SkyProdigy mounts have served me well over time for Remote Video Astronomy.
I love the quick setup (and pack up) of the SkyProdigy Alt-Az mount, and have successfully used a MCR-80 ED, a Coronado PST (solar) and a Celestron 5” telescope on it, but it would not handle my 8” telescope. I decided to get a Celestron Evolution to be able to use my 8” telescope on a sturdy, portable Alt-Az mount. It also has a built in Lithium battery and Wi-Fi mount control, both of which are great for RVA. The Evolution is available with either a 6”, 8” or 9.25” telescope. I already had an 8” telescope and decided to get the Evolution 6 since I could also use its 6” telescope on the SkyProdigy mount.
I love the quick setup (and pack up) of the SkyProdigy Alt-Az mount, and have successfully used a MCR-80 ED, a Coronado PST (solar) and a Celestron 5” telescope on it, but it would not handle my 8” telescope. I decided to get a Celestron Evolution to be able to use my 8” telescope on a sturdy, portable Alt-Az mount. It also has a built in Lithium battery and Wi-Fi mount control, both of which are great for RVA. The Evolution is available with either a 6”, 8” or 9.25” telescope. I already had an 8” telescope and decided to get the Evolution 6 since I could also use its 6” telescope on the SkyProdigy mount.

As I unpacked my Evolution 6, I was reminded of my experience of learning to use my original Celestron 8se that led to the writing of my first book (amazon.com/author/jimmeadows). Several of the things I described in that book are also applicable to the Celestron Evolution (e.g., What do I need to keep in mind when I use SkyAlign).
Below are some guidelines when beginning to use the Evolution mount, some of which are applicable when first using any new mount and telescope. Take time to learn each of the features one at a time until you are familiar with its function. Trying to do too much all at once can lead to frustration. Here is a suggested learning order:
Part 1 – Setup and Operation
Unpack and Set up
Set aside some time to initially unpack and set up your equipment for the first time inside as described in the instruction manual.
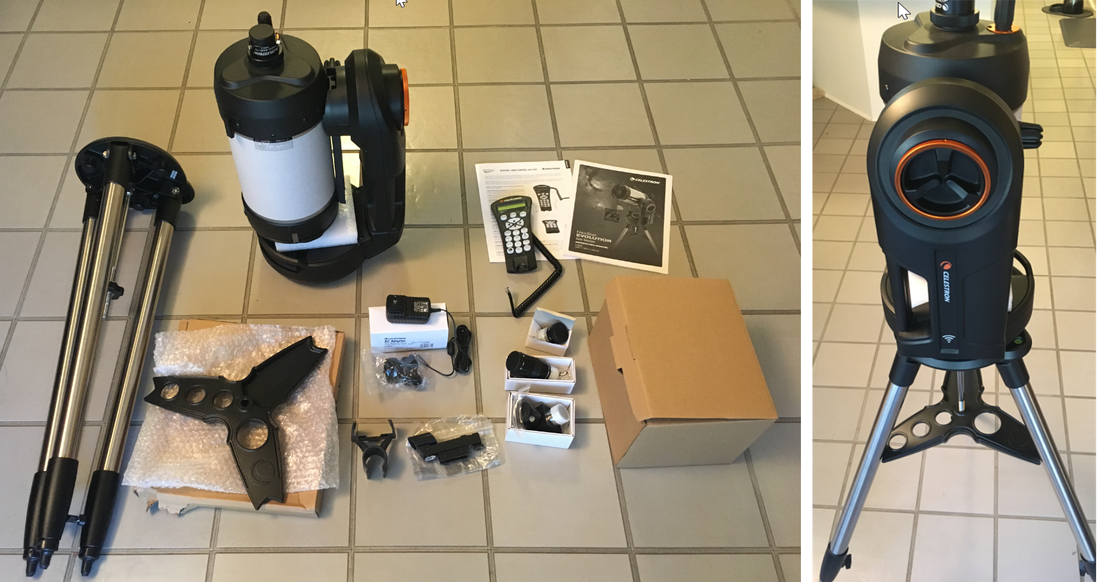
Getting the mount centered on the tripod can be a little tricky. After you do it once, carefully loosen the quick release knob, remove the telescope, and then repeat removing and reinstalling the mount (without the telescope) onto the tripod a few times using the mounting bolts to get the hang of attaching the mount to the tripod.
 |  |  |
Use of clutches
The clutch knobs on the Evolution are great! You can easily engage/disengage the altitude and azimuth clutches separately using the easily gripped large orange round clutch knobs.
 | 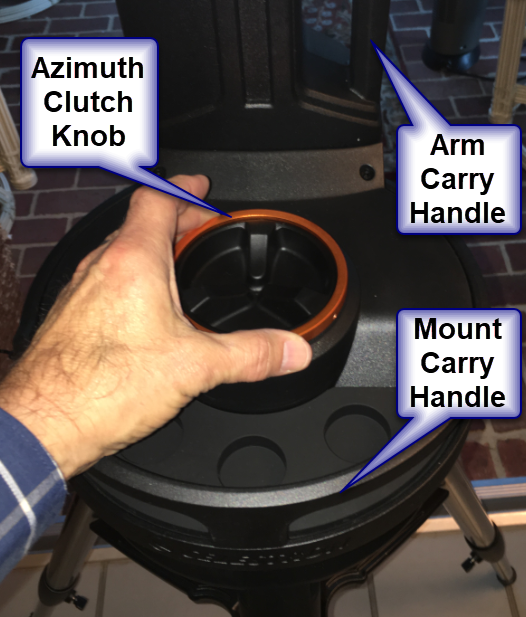 |
I really like that you can freely rotate the mount by hand when the azimuth clutch is disengaged. Don’t forget to tighten the azimuth clutch in the center of the mount after rotating the mount by hand. Also once you perform an alignment, don’t disengage either of the clutches or else you will lose your alignment.
Moving telescope with hand controller
There should be a good charge on its internal battery right out of the box so you can turn it on and practice moving the telescope in all directions using the hand controller. While you are inside it is a good time to get familiar with the hand controller screens. If you have used a Celestron hand controller before, most of it will be familiar. Unfortunately the manual has “Getting Started – Using Your Smart Device” before “Getting Started – Using the NexStar+ Control”. Its fine to load the Celestron SkyPortal on your smart device (phone, tablet, etc.) and try out the Wi-Fi while you are inside (use Connect only). However, I highly recommend using the hand controller for your first viewing at night so you focus on getting used to your new mount and telescope.
Adjusting the Finderscope
The manual says that adjusting the finderscope is best done at night because the LED dot will be difficult to see during the day. I recommend doing this late in the day before it gets dark. It is a lot easier to get the findersope lined up where the telescope is pointing at something in the distance while there is still daylight. Turn the LED brightness up to full and you should be able to see it OK, and you can see and use the adjustment knobs easier. By the way, I prefer using a Telrad Finder Sight rather than the smaller LED dot finders that typically come with telescopes.
Hand control SkyAlign
I recommend you perform your first SkyAlign using the hand controller. It is easier to use its buttons to move the mount than using the virtual buttons of SkyPortal. The hand controller buttons respond immediately when pressed or released. Sometimes there are delays with the SkyPortal virtual buttons. The SkyPortal buttons are OK once you get used to using them and you are familiar with how the mount operates.
Viewing objects using hand control
Once aligned, you are ready to begin your viewing session. Although I use Video Cameras often, I like to start a new setup with an eyepiece until I get the feel of the mount and its operation. Refer to the manual for the various ways you can select and automatically slew to a target. I often use the Solar System to select the Moon, the Stars button to select from the Named Stars catalog, and the Deep Sky button to select from the Messier catalog.

Using the hand controller for your first visual viewing also gives you a feel for any minor drift that may occur after slewing to an object due to play between the gears (backlash). This is particularly important when you later start using a camera.
Part 2 – Advanced Operation
Connecting to mount Wi-Fi
Something I observed about my mount that differed from my instruction manual is my mount Wi-Fi name was Celestron-## rather than SkyQLink-##.
Part 2 – Advanced Operation
Connecting to mount Wi-Fi
Something I observed about my mount that differed from my instruction manual is my mount Wi-Fi name was Celestron-## rather than SkyQLink-##.

I do agree with the instructions that you should familiarize yourself with connecting to the Wi-Fi and application during the day before using it at night. Be sure to use just the Connect option while trying it out during the day (not the Connect and Align).
Moving telescope with SkyPortal Wi-Fi
As I previously noted, there is a learning curve when beginning to use the virtual arrow buttons of the SkyPortal app to point your telescope. You also need to make use of the slider to adjust the speed to high when moving to different sky positions, and much lower when attempting to center a star or target. I also found when holding the virtual left arrow button down near the edge of an iPhone you can accidentally switch to a different application and lose your connection to the mount’s Wi-Fi (just restart the app and select Connect). Note: This was less likely to happen if I pressed the left arrow using my right hand. For fine adjustments I tend to tap the virtual buttons rather than holding the button down (i.e. tap it a few times rather than press and hold).
SkyPortal SkyAlign
There are two ways to connect to the mount using SkyPortal. “Connect And Align” initiates an alignment procedure, while “Connect” just establishes a connection to the mount without affecting the alignment.

Connect is useful if you lose your Wi-Fi connection due to walking away from the mount and you need to reconnect when you get back. When you select Connect And Align you use the arrows on the screen to manually slew to a bright star to begin your alignment. If you overshoot when manually slewing toward a star, move the Rate slider to the left to reduce the speed to then make it easier to center the star. You will also learn when using the high rate to stop pressing the arrow button as you get near the target object to reduce overshooting. One advantage to using the SkyPortal SkyAlign is you do not have to set the time and location since that is supplied by your device. NOTE: Connect And Align will erase any prior alignment, so don’t use this if you have already aligned the mount.
Observing objects using SkyPortal
SkyPortal has several ways to select objects as described in the manual. It is a very nice way to visually see, select and slew to a target. NOTE: If you have used the SkyPortral SkyAlign process, do not use the hand controller to select and slew to an object since it does not have access to the alignment performed by using SkyPortal. Likewise do not perform an alignment using the hand controller, then select Connect in SkyPortal and try to slew to an object since SkyPortal does not have access to the alignment in the hand controller. It is OK to use the arrow buttons on the hand controller to fine tune your position even if you have performed a SkyPortal SkyAlign, just don’t use the GoTo function of the hand controller.
Checking Battery Status
When you are connecting by Wi-Fi to the mount, tap the settings gear icon to the left of the Rate slider. The current Battery Status level will be displayed at the top right under Scope Setup. This is useful if your mount seems to be slowing down and you suspect the battery is getting low. If it is low, you can plug the charger into the mount to maintain alignment and complete your viewing session.
In general, if I am going to be next to my mount I prefer to use the Hand Controller to align my mount and slew to objects rather than using SkyPortal. I can still use the SkyPortal Connect function though just to check the battery level.
Adjusting Settings
There are several settings you can adjust using either the hand controller or SkyPortal. The ones I find particularly useful are Tracking Rate, Altitude Slew Limits, Lighting and sometimes Anti-Backlash.
Adding a Camera & Cable
Once you have had some successful visual viewing sessions and are comfortable with your new mount and telescope, it is time to add a good Video Astronomy camera to see much more in near real time than you can see with your eye. When adding a camera I like to try it out during the daytime to adjust the telescope balance as needed with the camera and cable(s) installed. It also gives me time to find the best way to secure the cables to avoid affecting the alignment while the mount is slewing. With the Evolution, I usually use a MallinCam Video Astronomy camera that has a single USB cable such as the DS2.3+ or DS10c. If I go inside, I connect the camera's USB cable to an active USB extension cable to control the camera and view the image remotely.
Reducing Backlash
I have noticed a little drift immediately after slewing to an object, which is more noticeable when using a camera. I found this can be reduced by balancing the telescope with the camera in place before you begin. Loosen the quick release knob slightly so you can slide the telescope forward or back as needed and retighten. If I still see some slight drift after slewing to an object, rather than waiting for the gears to take up the slack I simply use the arrow controls to move the mount slightly in the direction opposite to the observed drift and the image will quickly stabilize. You could also try adjusting the hand controller backlash values, but I prefer to manually take up the slack as needed. Once the tracking is fully engaged, the Evolution works well for the short exposure times used for Video Astronomy with an 8” telescope and camera.
Adding StarSense AutoAlign
If you can afford to add Celestron’s StarSense AutoAlign it will simplify your life! After adding a quality Video Astronomy camera, I can highly recommend getting the StarSense AutoAlign. It eliminates trying to peer upward though a finder at awkward angles to get a good centering of a star. This is especially beneficial when using a camera. I also get a more accurate alignment when I use the StarSense AutoAlign. Even though you can use StarSense with SkyPortal, I prefer using the StarSense Hand Control to perform the auto align process (just plug in the StarSense Hand Control in place of the Evolution Hand Control). You can have your camera in place at the beginning of a session, turn on the mount, initiate an auto align and be ready to start viewing in about 4 minutes.
Adding SkyFi
Yes, I know the Evolution has built in Wi-Fi. So why would I use an external Wi-Fi device like SkyFi? I like using a Hand Controller and StarSense AutoAlign to begin when next to the telescope. Then I turn on SkyFi and can use SkySafari on my phone or tablet to select and slew to objects, but can also still use the StarSense Hand Control to select and slew to objects. (I should also note that the Evolution Hand Control has a different connector at the bottom which would require a different cable to connect to SkyFi than what I normally use). SkyFi seems to have a stronger Wi-Fi signal than the mount, and I can go inside and control my mount using SkySafari using my Remote Video Astronomy setup. It is nice how the Hand Controller and SkyFi can both fit on the top of the mount base and rotate with it without any cord wrap issues.
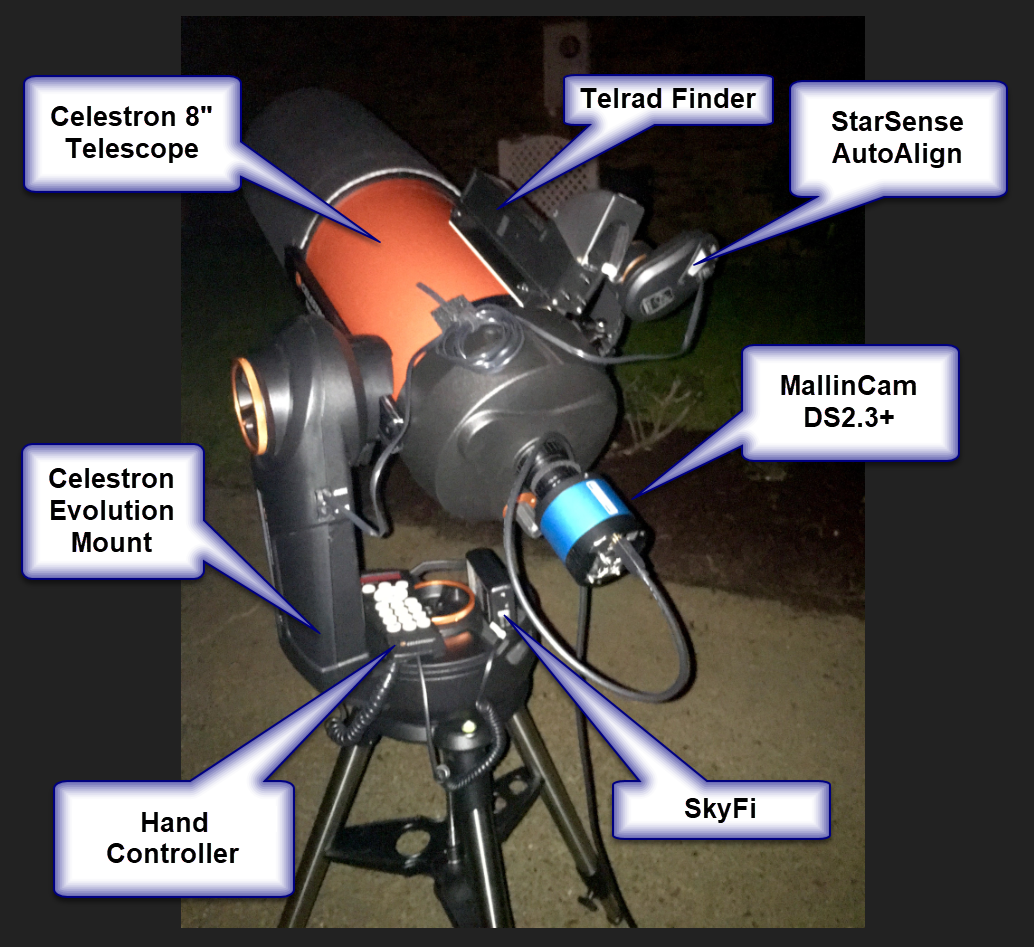
My Evolution 8” Setup
Here is my complete setup using my 8” telescope on the Evolution mount for Remote Video Astronomy.
 RSS Feed